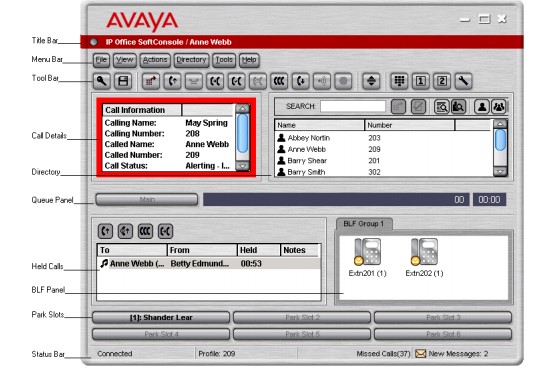
The SoftConsole main screen is divided into the following areas:
· Title Bar
The Title Bar contains the name of the person who is logged in to SoftConsole. When SoftConsole is the active
program, the title bar is shown in Orange. If SoftConsole is not the active program, the title bar is purple. Screen
colors are different if an alternative skin is applied.
· Menu Bar
Commands & actions are available through menus. Some items are only accessible when the right conditions occur,
for example, when a call is received.
· Toolbar
The toolbars provide shortcuts for options that are frequently used.
· Call Details Panel
The panel contains a side-by-side display of current call information. The panel on the left contains details of the
current call. The panel on the right contains the directory and individual extension details. It can also contain a script
file and conferencing information.
· Queue Panel
The Queue panel displays graphical information on the status of calls held in queues.
· Held Calls Panel
Any calls that are being held are listed in the Held Calls panel.
· BLF Panel (Busy Lamp Field Panel)
The icons represent dialable numbers. If the icons represent internal users, the user's status is indicated.
· Park Slot Panel
The park slot panel can contain up to 16 park slot buttons.
· Status Bar
The status bar confirms that you are connected to the telephone system and the profile that you are using. There is
also an indication of the number of new messages and missed calls that you have had.
Views
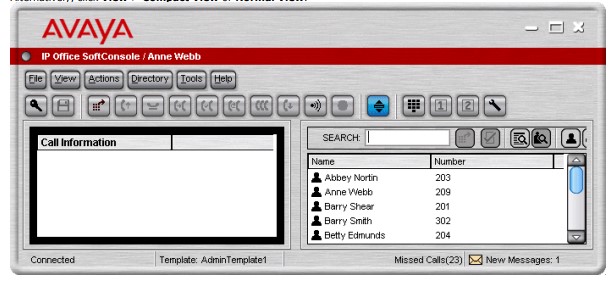
SoftConsole can be run in compact or normal view modes. In compact mode, none of the panels below the calls details
and directory are shown. The queues, held calls and BLF panels are hidden, as can be seen in the example.
To toggle between the views:
1. Click
Alternatively, click View > Compact View or Normal View.

Note
· Press Home on your keyboard to toggle between the compact and normal views
Viewing the Call History
The Call History pane replaces the BLF and Held Calls panels. The Call History Panel can not be viewed at the same time
as the BLF and Held Calls panels. If the profile loaded does not contain the BLF and Held Call panels, you can not view the
Call History. For example, when the AdminTemplate3 default template is used you can not view the Call History panel.
To view the call history:
1. Click View > History. The Call History details replace the BLF and Held Calls panels.

The Call History Pane is divided into the following tabs:
· In - Lists all calls received at your extension.
· Out - Lists all calls made from your extension.
· Missed - All the unanswered calls to your extension.
· All - Lists all the incoming, outgoing and missed calls.
Each tab displays a maximum of 100 calls. When the maximum capacity is reached, the oldest record is deleted when a
new record is added. The number in brackets on the tab shows the number of calls listed. Within each tab there are the
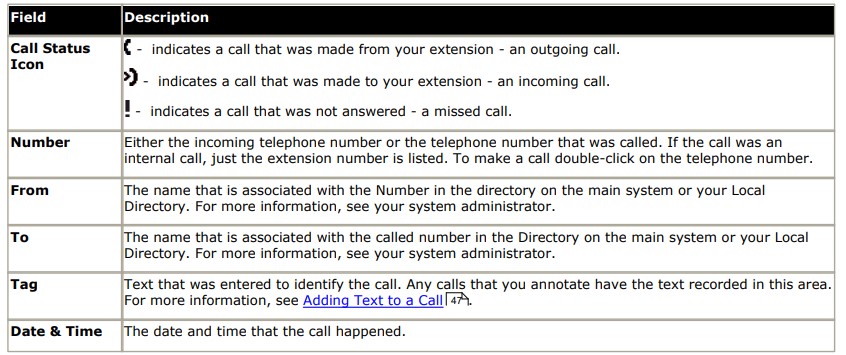
following fields:

The following options are available when you right-click within a tab:
· Clear - The call information listed in the current pane is cleared.
· Clear All Tabs - The information listed in all the Call History tabs is cleared.
To return to the Held Calls and BLF panels view:
1. Click View > Call History.